
How to Remove Acrylic Nails at Home Safely Without Damage
Acrylic nails can look beautiful and make your hands feel instantly polished, but removing them the wrong way can leave your natural nails weak, thin, and damaged. Are you dealing with dry or peeling nails after acrylics? Our detailed nail recovery guide can help restore them beautifully.
If you’ve ever been tempted to pull, peel, or force acrylics off at home, you’re definitely not alone. The good news is that you don’t need an expensive salon visit to take them off safely. With a little patience and the right method, you can remove acrylic nails at home gently while keeping your natural nails healthy and strong.
In this guide, you’ll learn simple, beginner-friendly steps to remove acrylics without pain, breakage, or unnecessary damage. Whether your nails have grown out, started lifting, or you’re simply ready for a fresh look, these easy tips will help you protect your natural nails and keep them looking smooth, clean, and beautiful even after the acrylics are gone.
Easy Steps to Remove Acrylic Nails at Home Safely
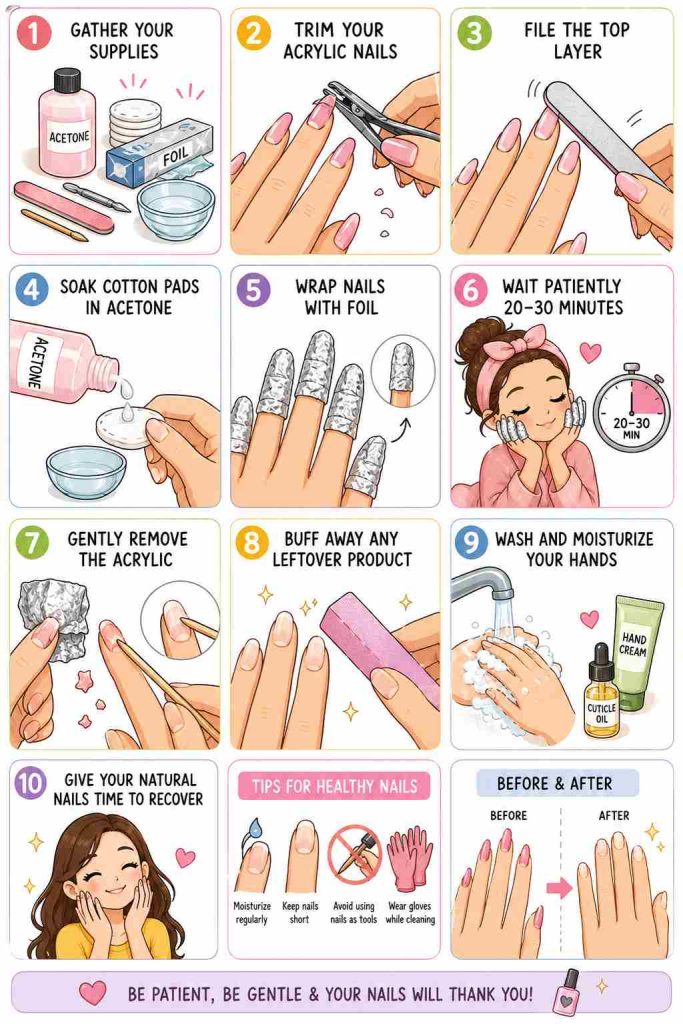
Removing acrylic nails at home may seem difficult, but with the right steps and a little patience, you can do it safely without damaging your natural nails. The key is to avoid pulling or peeling the acrylics off, since that can leave your nails weak, thin, and painful. Instead, using gentle removal methods will help protect your natural nails while keeping them healthy and smooth. Follow these simple steps to remove acrylic nails at home safely and easily.
1. Gather Everything You Need
Before you begin removing your acrylic nails, make sure you have all the necessary tools ready in one place. Having everything prepared beforehand makes the process smoother, easier, and less stressful. It also helps you avoid rushing or damaging your natural nails by using the wrong tools.
You’ll need a nail clipper to trim down the acrylic length, a nail file to remove the shiny top coat, acetone to dissolve the acrylic, cotton balls or cotton pads, and small pieces of aluminum foil to wrap around your fingertips. A cuticle pusher or orangewood stick will help gently lift the softened acrylic without forcing it off. It’s also a good idea to keep a nail buffer, cuticle oil, and hand moisturizer nearby for aftercare.
Choose a comfortable place with good lighting and protect your surface with a towel or paper towel because acetone can sometimes spill or damage furniture. Taking a few extra minutes to set everything up properly will make the removal process much safer for your natural nails and help you achieve cleaner, healthier-looking results at home.
2. Trim Your Acrylic Nails Short
Start by carefully trimming your acrylic nails as short as possible using a nail clipper. Long acrylic nails can be harder to remove and may put extra pressure on your natural nails during the soaking process. Cutting down the length first helps make the removal easier, faster, and much safer.
Trim small sections at a time instead of trying to cut the entire nail in one go, since acrylic nails are thick and can sometimes crack if too much pressure is applied. Be gentle and take your time to avoid hurting your natural nails underneath. If the acrylic feels too hard to clip, you can lightly file the edges first to soften the shape.
Shorter acrylic nails also allow the acetone to work more effectively because there is less product to dissolve. This step may seem simple, but shortening your acrylic nails beforehand helps the soaking process work more effectively and comfortably.
3. File Off the Top Coat
Before soaking your acrylic nails, gently file away the shiny top layer using a coarse nail file. The glossy top coat acts as a protective barrier, and removing it helps the acetone penetrate the acrylic faster and more effectively. This step can make the soaking process much quicker and easier.
Use light pressure when filing, and move the file gently across the nail surface. There’s no need to file too deeply; you only want to remove the shiny finish, not your natural nail underneath. Filing too aggressively can cause sensitivity or thinning, so it’s best to work slowly and carefully. You may notice the nail surface becoming dull or powdery, which means the top coat is being removed properly. This will help the acetone absorb better and make the acrylic nails easier to remove.
4. Soak Cotton Balls in Acetone
Once the top coat has been filed off, soak cotton balls or cotton pads completely in acetone. Acetone is the main ingredient that helps break down and dissolve the acrylic, making it easier to remove without forcing or peeling the nails off. For the best results, use pure acetone instead of regular nail polish remover, since it works much faster and more effectively on acrylic nails.
Place the soaked cotton directly on top of each nail, making sure the entire acrylic surface is covered. The cotton should be damp enough to keep the nail fully saturated during soaking. This helps soften the acrylic evenly and prevents dry spots that can make removal more difficult.
Because acetone has a strong smell and can dry out the skin, try to work in a well-ventilated area. You can also apply a little petroleum jelly or cuticle oil around your nails beforehand to help protect the skin from dryness. Taking your time during this step helps loosen the acrylic gently while keeping your natural nails safer and healthier.
5. Wrap Nails With Foil
After placing the acetone-soaked cotton on your nails, wrap each fingertip with a small piece of aluminum foil to keep the cotton securely in place. This helps trap heat around the nails, allowing the acetone to work faster and soften the acrylic more effectively.
Make sure the foil is wrapped snugly but not too tightly, so it stays comfortable while your nails soak. If the cotton moves around or slips off, the acrylic may not dissolve evenly. You can gently press the foil around your fingertips to hold everything in place properly.
Once all your nails are wrapped, let them sit undisturbed for about 20 to 30 minutes. During this time, the acrylic will slowly begin to loosen and soften, making it much easier to remove without scraping or pulling too hard.
6. Wait Patiently for 20–30 Minutes
Once your nails are wrapped in foil, allow them to soak for about 20 to 30 minutes. During this time, the acetone will slowly break down the acrylic, helping it soften and loosen from your natural nails. Being patient during this step is very important because rushing the process can lead to unnecessary nail damage.
Try not to unwrap the foil too early or force the acrylic off before it becomes soft enough. If the acrylic still feels hard after 20 minutes, simply rewrap the nail and let it soak a little longer. Every set of acrylic nails is different, so some may take extra time to fully loosen.
While waiting, you can gently press the foil around your nails occasionally to help the acetone stay evenly distributed. Giving the acrylic enough time to soften properly will make the removal process much easier, gentler, and safer for your natural nails.
7. Gently Remove the Acrylic
After the acrylic has softened, carefully unwrap one nail at a time and gently push off the loosened product using a cuticle pusher or orangewood stick. The acrylic should come off easily without much effort. If you have to scrape too hard, it usually means the acrylic needs more soaking time.
Work slowly and gently to avoid damaging your natural nails underneath. Never pull, peel, or force the acrylic off, since this can remove layers of your natural nail and leave them thin, weak, or painful. It’s always better to soak a little longer than to rush the process.
You may notice some small pieces of acrylic still attached to the nail, which is completely normal. Simply reapply acetone and let those areas soften again before trying to remove them. Taking your time with this step helps keep your natural nails healthier, smoother, and less likely to break after the acrylics are gone.
8. Buff Away Any Leftover Product
Once most of the acrylic has been removed, you may notice a few small patches of leftover product still sitting on the surface of your nails. Use a soft nail buffer to smooth away any remaining acrylic residue.
Buff lightly and slowly using gentle motions across the nail surface. There’s no need to press too hard, because your natural nails may already feel slightly sensitive after soaking in acetone. Over-buffing can make nails thinner and weaker, so it’s important to be as gentle as possible.
After buffing, your nails may look a little dull, which is completely normal. Applying cuticle oil or nail serum afterward can help restore moisture and bring back a healthier, natural shine.
9. Wash and Moisturize Your Hands
After removing the acrylic nails, wash your hands thoroughly with mild soap and lukewarm water to remove any leftover acetone, dust, or acrylic residue. Your skin and nails may feel dry after soaking in acetone, which is completely normal since acetone can strip away natural moisture.
Apply a rich hand cream, cuticle oil, or nail serum to hydrate your hands and dry cuticles. Gently massage the product into your cuticles and nail beds to help restore softness and keep your natural nails healthy and nourished.
10. Give Your Natural Nails Time to Recover
After removing acrylic nails, your natural nails may feel soft, thin, or slightly sensitive for a few days. This is completely normal, especially if you’ve been wearing acrylics for a long time. Giving your nails a short break from acrylics, gel polish, or other harsh products can help them recover naturally and become stronger again.
Keep your nails hydrated by applying cuticle oil, hand cream, or nail-strengthening treatments regularly. Moisture is important because acetone and acrylic products can leave nails feeling dry and brittle. You can also trim your nails short during the recovery period to help prevent splitting or breakage.
FAQ’s About Removing Acrylic Nails
How long does it take to remove acrylic nails?
Removing acrylic nails usually takes around 30 to 45 minutes, depending on the thickness of the acrylic and how long it takes to soften completely.
Can I remove acrylic nails without acetone?
No, acetone is the safest and most effective way to remove acrylic nails at home. You may see other DIY methods, like soaking nails in warm soapy water, but these methods usually do not dissolve the acrylic completely. As a result, people often end up pulling or scraping the acrylic off, which can damage natural nails. Acetone helps break down the acrylic properly, making the removal process easier, safer, and less damaging to your natural nails.
Why do my nails feel weak after acrylic removal?
Your nails may feel dry or soft after acrylic removal because of the acetone and pressure from wearing acrylics for a long time. With proper nail care and hydration, they usually recover over time.
How often should I take breaks from acrylic nails?
It’s a good idea to give your natural nails a break every few months so they can recover, stay healthy, and maintain their natural strength.
Conclusion
Removing acrylic nails at home can be safe and easy when done with patience and the right technique. Instead of pulling or peeling the acrylic off, taking the time to properly soak and gently remove it can help protect your natural nails from unnecessary damage. While the process may take a little longer, keeping your nails healthy and strong is always worth it.
After removal, remember to give your natural nails extra care and hydration so they can recover properly. Using cuticle oil, moisturizer, and nail-strengthening treatments can help restore softness and improve nail health over time. With the right aftercare, your natural nails can stay beautiful, smooth, and healthy even after acrylic removal.


